Microcontrol

Tuesday, July 8, 2025

OS 9.2.2 & Apps: Disk Usage

 Disk Space Analysis

This section (or series of posts) will be the core of our exploration, diving deep into the actual storage consumption on the iMac G3 after the complete installation of Mac OS 9.2 and its associated applications.

Application and Update Descriptions

These programs were essential components of the Mac OS 9.2.2 experience during that era, each with its specific role, function, and key features.

1. Mac OS 9.2.2 Update

Type: Operating System Update

Primary Function: Not a standalone application, but the final and most complete update for Mac OS 9.x.

Key Features/Significance:

Stability and Compatibility: Addresses bugs, improves system stability, and enhances compatibility with later hardware and software releases of that period.

Network Connectivity: Improves network capabilities, especially with AirPort (Apple's early Wi-Fi).

Performance: Offers overall system performance enhancements.

End of Classic Mac OS Era: Marked as the last official update to the Classic Mac OS line before the full transition to Mac OS X, making 9.2.2 the most stable and popular version for those who preferred to continue using Classic Mac OS.

Notes/Relevance: Essential for running certain applications that require the most stable version of Mac OS 9, and serves as the crucial foundation for your system.

2. QuickTime Player (Specifically QuickTime Player 6.0.3)

Type: Multimedia Player and Framework

Primary Function: Used for playing various multimedia files including video (MOV, AVI), audio (MP3, WAV), and animations.

Key Features/Significance:

Apple's Standard: QuickTime was Apple's core technology for multimedia handling during that era. .mov video files were widely prevalent.

Broad Format Support: Even for its time, it supported a wide range of media formats, including basic streaming capabilities.

Bug Fixes: Version 6.0.3 included improvements in stability and security compared to earlier versions.

System Integration: Often pre-installed with Mac OS or considered an essential component for compatibility with websites and other applications that utilized QuickTime for media playback.

Notes/Relevance: An indispensable basic program for watching videos or listening to audio in the Mac OS 9 era, and also served as a framework for other applications to handle media.


3. Thai Language Pack

Type: Language Extension / Localization

Primary Function: Adds the capability to display, input, and support the Thai language within Mac OS 9.2.2.

Key Features/Significance:

Correct Thai Display: Ensures that the operating system and various applications can correctly display Thai characters without corruption or "boxes."

Thai Input: Enables Thai keyboard input, allowing users to type documents or communicate in Thai.

Text Layout: May include improvements for Thai text layout and word-breaking.

Menus and Dialogs: Some parts of the system or applications might switch to Thai (depending on the level of localization).

Notes/Relevance: Absolutely essential for users in Thailand or anyone needing to work with Thai language documents on Mac OS 9.2.2. Without this pack, Thai language use would be difficult or incomplete.

4. SimpleText

Type: Basic Text Editor

Primary Function: Used for quickly creating, opening, viewing, and editing small text files (.txt).

Key Features/Significance:

Simple and Fast: A very lightweight application that opens instantly and requires minimal system resources.

Default Viewer: Often the default program used to open README files or general text documents that came with other software.

Text-to-Speech: Had the unique ability to convert text into spoken audio files using Mac's system voices (e.g., MacinTalk).

Basic Drawing: Also had basic bitmap graphic drawing capabilities, allowing users to create and save simple images (PICT files), though this wasn't its primary function.

Notes/Relevance: "that requires Mac OS 9.2.2 to be open at Startup first" – This means SimpleText is a fundamental application pre-installed with Mac OS 9.x and is ready to use as soon as the operating system boots up. It is not a separate program that needs additional installation; it's an integral part of the Classic Mac experience.
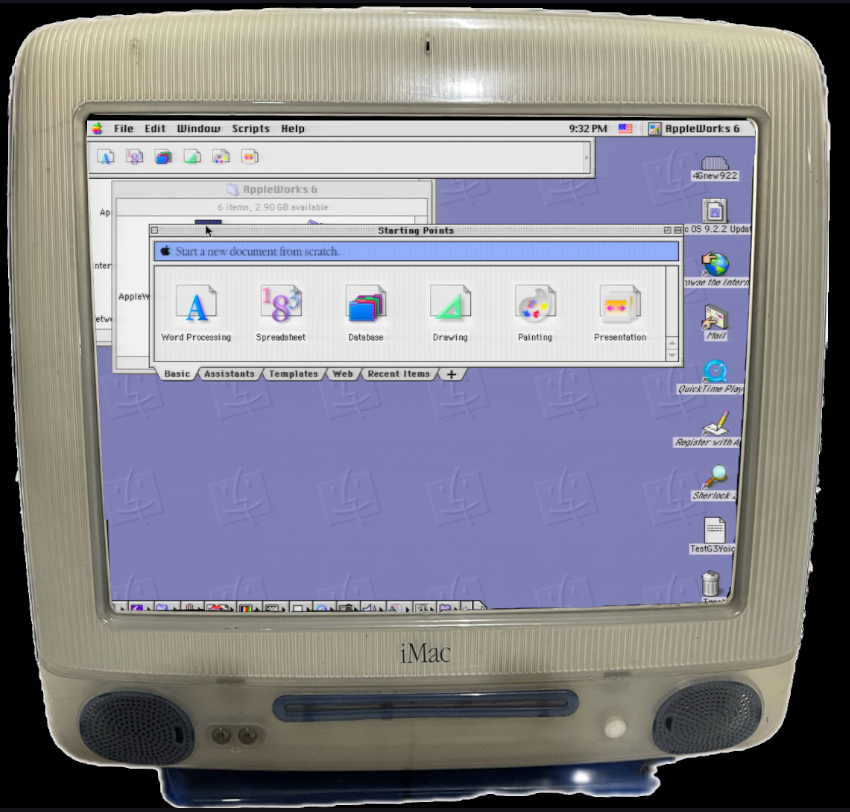


5. AppleWorks 6

Type: Integrated Productivity Suite (All-in-One Office Suite)

Primary Function: Combines multiple office application types into a single suite for creating a variety of documents.

Key Features/Significance:

Versatile Functions: Its biggest strength was integrating the capabilities of:

Word Processing: For writing documents and reports.

Spreadsheet: For calculations and numerical data management.

Presentation: For creating slideshows.

Database: For simple data management.

Drawing: For creating vector graphics.

Painting: For creating and editing bitmap images.

User-Friendly: Featured an intuitive interface, making it suitable for general users, students, or small businesses.

Compatibility: Could open and save files in various formats to some extent (e.g., basic Microsoft Word, Excel formats of that era).

Popularity in Classic Mac Era: A popular alternative office suite for Mac users when Microsoft Office wasn't as prevalent, or for those seeking a more cost-effective option.

Notes/Relevance: This application consumed a relatively large amount of disk space compared to SimpleText but provided comprehensive functionality for general office tasks of that period.

I hope this detailed explanation helps clarify the functions and highlights of each program you're running on your Mac OS 9.2.2!


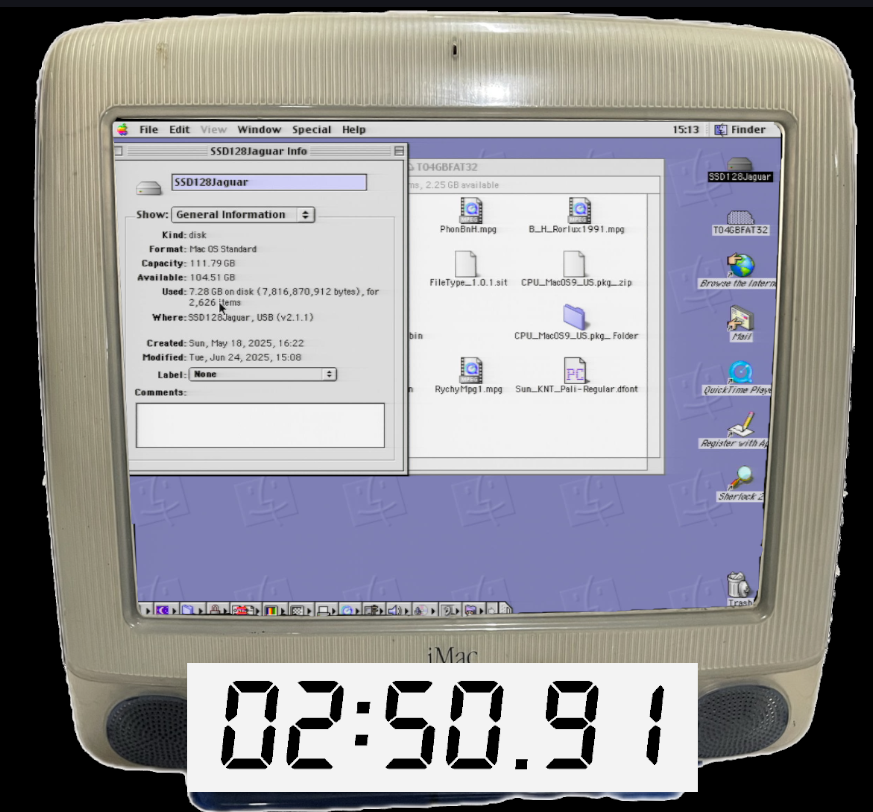
Mac OS 9.2.2 & Essential Apps: Real-World Disk Usage on a 4GB USB Drive

Content Summary:
This post summarizes the actual disk space utilized by a complete installation of Mac OS 9.2.2, alongside key applications such as QuickTime Player 6.0.3, AppleWorks 6, the Thai Language Pack, and SimpleText, when deployed on a USB drive.

As demonstrated by the "Get Info" screenshot of the "4Gnew922" USB drive (with a usable capacity of 3.73 GB), the total disk space consumed by the operating system and these essential applications is precisely 849.3 MB. This leaves a substantial 2.9 GB of available space on the drive, indicating that even with these core components, the setup remains relatively compact and efficient for a vintage Mac OS environment. This measurement reflects the collective footprint of approximately 4,545 individual items.


Wednesday, July 2, 2025

Speed Test: Video Launch G3, USB 4GB, and SSD 128GB

 Boot Speed Battle: iMac G3 (Mac OS 9.2) vs. USB vs. SSD

A Blast from the Past: Remembering the iMac G3 Launch

Before we dive into the nitty-gritty of boot speeds and performance metrics, let's take a moment to appreciate where it all began: the iconic launch of the original iMac G3. For many, this vibrant, translucent all-in-one represented a bold new direction for Apple, spearheaded by Steve Jobs' triumphant return.

The unveiling was more than just a product announcement; it was a spectacle. We remember the anticipation as Jobs dramatically pulled back the cover, revealing a computer that redefined personal aesthetics. The excitement surrounding this revolutionary machine was palpable, ready to experience the future.


The iMac G3 (Mac OS 9.2) booting up during its initial showcase.

And then, the boot-up. The moment the Apple logo appeared, followed by the familiar "Mac OS" welcome screen, was a significant part of the experience. It was the first step into a new computing era for many, highlighted by the ease of getting started. This initial boot, as captured in the image with the prominent "04:45" timestamp, serves as our baseline – a reminder of the origins of our speed comparison.

This historical context is crucial as we prepare to pit this classic against modern storage solutions in a true boot speed battle. How much has technology truly advanced since this colorful beginning? Let's find out!

The Original Benchmark: iMac G3's Boot Time Revealed

To truly appreciate the advancements in booting technology, we must first establish a baseline from the past. Our journey into speed begins with the very machine that captured the public's imagination: the iMac G3 running Mac OS 9.2. We'll measure its boot performance directly from its original launch video, from the moment the power button is pressed until the desktop is fully loaded and ready for use.


As seen in the first image, our timer begins precisely when the child presses the power button, with the on-screen timestamp reading 04:40. This is the starting gun for the iMac G3's boot sequence.

The system then goes through its classic Mac OS boot process: the chime, the smiling Mac, the loading extensions, and finally, the desktop. As the second image shows [referencing 8_07.jpg], the iMac G3's desktop is fully rendered and operational, with the iconic icons in place and ready for interaction, at timestamp 08:07.


By calculating the difference between these two points, we find that the original iMac G3, as demonstrated in its launch context, took 3 minutes and 27 seconds (08:07 - 04:40) to boot from a cold start to a usable desktop.

This might seem like a leisurely pace by today's standards, where solid-state drives can boot systems in mere seconds. However, for its time, this was the expected performance, a result of the slower hard drive technology and the processes involved in loading Mac OS 9.2. This "original benchmark" provides the essential context against which we'll compare the capabilities of modern USB drives and lightning-fast SSDs.

Beyond the Original Drive: Why USB and SSD for Our Comparison

Having established the baseline boot time of the iMac G3 from its original video launch, our next step is to introduce our modern contenders: a 4GB USB drive and a 128GB SSD. You might wonder why we're not testing against a modern internal hard drive directly within the iMac G3. The answer lies in the limitations of vintage hardware. The iMac G3, like many machines of its era, relies on an internal IDE bus for its primary storage. Unfortunately, this aging technology is prone to failure over time, and a fully functional IDE bus is not always a given for these vintage machines.

To overcome this common hurdle and still provide a meaningful comparison against the original boot time, we've opted for external boot solutions. This approach allows us to bypass the potential unreliability of the internal IDE interface while showcasing how much external storage technology has advanced.

Our Test Setup Explained:


As illustrated in the diagram, our testing environment leverages the iMac G3's native USB ports. While the iMac G3 utilizes older USB standards (USB 1.1 or 2.0), it still provides the necessary interface for our external boot drives:

USB Hub Integration: To accommodate multiple peripherals, we connect a 4-Port USB 3.0 Hub to one of the iMac G3's available USB ports (highlighted by the red box in the image). This hub acts as our central connection point.

Peripherals: Your essential mouse and keyboard are connected to this USB hub.

The Boot Drives: Crucially, our test subjects – the 4GB USB drive and the 128GB SSD (connected via a SATA to USB adapter) – are also plugged into this hub. This allows the iMac G3 to attempt to boot from these external, more modern storage devices.

External DVD Drive (for OS Installation): The image also shows an external DVD drive connected to the USB hub, drawing both power and data via USB. This setup is typical for installing an operating system onto the external boot drives, further demonstrating the flexibility of USB booting.

This methodology ensures that despite the limitations of the iMac G3's internal hardware, we can still perform a fascinating and relevant boot speed comparison. It highlights the ingenuity required to modernize classic machines and sets the stage for discovering just how much faster booting has become.

The Portable Challenge: USB 4GB Boot Performance
With our test setup configured to boot from external USB devices, our first modern challenger enters the ring: a standard 4GB USB flash drive. This portable, readily available storage solution represents a significant leap from the internal hard drives of the iMac G3 era. The key question is, how much of a performance boost can we expect when booting Mac OS 9.2 from a seemingly simple USB stick?


As depicted in the image above, the iMac G3 successfully boots Mac OS 9.2 from the USB drive. The desktop is fully loaded, with the familiar Finder interface ready for interaction. The open window, displaying the contents of the "4Gnew922" volume, clearly confirms that the system is operating directly from our 4GB USB test drive.

The critical data point, captured by the digital timer in the bottom right corner, reveals the impressive boot time: 02:56.88.

This means that the iMac G3, when booting from the 4GB USB drive, achieved a usable desktop in 2 minutes, 56.88 seconds. Comparing this to our original benchmark of 3 minutes and 27 seconds (or 03:27.00), the USB drive provides a noticeable improvement of over 30 seconds. This result immediately demonstrates the potential of even basic external solid-state storage over the internal, aging IDE hard drive, despite the iMac G3's slower USB 1.1/2.0 ports.

This sets an intriguing precedent for our final and potentially fastest contender: the SSD.

Final Contender: Measuring the 128GB SSD Boot Speed


Finally, we arrive at what is typically the fastest storage solution in modern computing: the Solid State Drive (SSD). For this test, we connected a 128GB SSD to the iMac G3 via a SATA to USB enclosure, utilizing the same USB hub setup as our previous test. The expectation, even with the vintage iMac's USB 1.1/2.0 limitations, is that the SSD's inherent speed and lack of moving parts should offer the quickest boot time of all.


As evidenced by the accompanying image, the iMac G3 successfully boots Mac OS 9.2 from the external SSD. The desktop is fully loaded and responsive. Crucially, the "SSD128Jaguar Info" window confirms that the system is indeed running from our 128GB SSD, identifying it as a USB-connected device and showing its ample capacity.

The moment the desktop became fully usable is captured by our digital timer: 02:50.91.

This means the iMac G3 booted from the 128GB SSD in 2 minutes, 50.91 seconds.

Comparing this to our previous results:

Original iMac G3: 3 minutes, 27 seconds (03:27.00)

USB 4GB Drive: 2 minutes, 56.88 seconds (02:56.88)

The 128GB SSD demonstrates the fastest boot time among all three contenders. While the improvement over the 4GB USB drive (a difference of about 6 seconds) might not seem as dramatic as the leap from the original hard drive, it still represents the pinnacle of performance achievable with this specific vintage hardware and the limitations of its USB interface. Even with bottlenecks, the superior random access and sustained read/write speeds of an SSD still offer an advantage.

This concludes our individual boot speed tests. The stage is now set for a comprehensive comparison and analysis of these fascinating results.

Unpacking the Results: Why the Speed Differences?

Our boot speed tests have shown a clear progression in performance: the USB drive outpaced the original hard drive, and the SSD, though by a smaller margin, edged out the USB drive. To understand why, we need to look beyond the raw numbers and delve into the fundamental differences in how these storage technologies operate, even when constrained by vintage hardware like the iMac G3's USB 1.1/2.0 interface.

1. Why USB 4GB was Faster than the Original Hard Drive
The significant speed bump from the iMac G3's original hard drive to the 4GB USB drive can be attributed primarily to the shift from mechanical (HDD) to solid-state (flash-based) storage.

Original Hard Drive (HDD):

Mechanical Nature: HDDs rely on spinning platters and read/write heads that physically move across the disk surface to locate data. This involves physical motion, which introduces significant delays (seek time and rotational latency).

Fragmentation: Over time, files on an HDD become fragmented, meaning pieces of a single file are scattered across different parts of the disk. Reading these files requires the head to move more, slowing down access. Booting an operating system involves reading thousands of small, fragmented files, which is where HDDs struggle.

IDE Interface: The iMac G3's internal IDE (Integrated Drive Electronics) interface, while standard for its time, offered much lower theoretical bandwidth and practical throughput compared to later interfaces.

USB 4GB Drive (Flash-based):

No Moving Parts: Being solid-state, a USB flash drive has no mechanical components. Data is accessed electronically from NAND flash memory chips. This eliminates seek time and rotational latency entirely.

Instant Access: This "instant access" capability (or very low latency) is a game-changer, especially for operations like booting an OS that require rapid, random reads of many small files. Even though the data is traveling over the iMac G3's slower USB 1.1/2.0 interface, the flash drive's ability to retrieve the data internally much faster than an HDD can still lead to overall quicker load times for numerous small files.

Resistance to Fragmentation: Flash drives are less affected by file fragmentation in terms of performance degradation because there's no physical head movement involved.

In essence, the USB flash drive's inherent ability to access data almost instantly, without the mechanical delays of a spinning platter, allowed it to deliver the necessary boot files to the iMac G3 much more efficiently than the original hard drive, resulting in a noticeable speed improvement.

2. Why SSD 128GB + SATA to USB Box was Faster than USB 4GB
While both the SSD and the USB flash drive are solid-state and use NAND flash, the SSD still managed to pull ahead, albeit by a smaller margin (around 6 seconds). This difference comes down to the quality of components, controller sophistication, and internal optimizations of an SSD.

USB 4GB Drive (Basic Flash):

Lower-Grade Flash: Consumer-grade USB drives often use cheaper, lower-performance NAND flash memory.

Simpler Controllers: Their controllers are typically basic, optimized for convenience and cost rather than high sustained performance or complex operations. They might lack advanced features like robust error correction, wear-leveling algorithms, and most importantly, support for high Input/Output Operations Per Second (IOPS).

Optimized for Sequential Reads: Many basic USB drives are better at sequential reads (reading one large file) than random reads (reading many small files, which is crucial for OS booting).

SSD 128GB (Premium Flash & Advanced Controller):

High-Quality Flash: SSDs use higher-grade, more reliable, and faster NAND flash memory.

Advanced Controllers: SSD controllers are highly sophisticated, featuring multiple channels for parallel data access, powerful CPUs for managing data flow, advanced error correction, and robust wear-leveling algorithms. They are specifically designed for high IOPS and low latency, making them excel at handling the numerous small, random reads and writes characteristic of an operating system.

Internal Efficiency: Even when constrained by the iMac G3's USB 1.1/2.0 interface, the SSD's superior internal speed and efficiency means it can process data much faster after it's been received from the USB bus. It's like having a super-fast internal engine that can quickly digest whatever data the limited USB pipe feeds it, leading to a slight but measurable advantage over the less efficient USB flash drive for demanding tasks like booting.

In summary, while the iMac G3's slow USB interface acts as a significant bottleneck for both solid-state devices, the SSD's inherently superior flash memory and advanced controller allow it to squeeze out every bit of available performance from that limited connection, making it the fastest overall contender in your boot speed battle.

And that's a wrap on our deep dive into the iMac G3's boot speed!


We've explored the historical context, detailed the methodologies, and unpacked the fascinating reasons behind the performance differences between the original hard drive, the 4GB USB drive, and the 128GB SSD. You've seen the numbers and understood the "why," but we know that for many, seeing is truly believing.

That's why we're hard at work putting together a comprehensive video demonstration of all these boot tests! Get ready to witness the classic iMac G3 springing to life (or taking its sweet time!) with each storage solution. It's the perfect visual companion to this analysis.

Stay tuned to our blog and social channels for the release of this exciting video – you won't want to miss seeing this Old Mac perform its New Tricks live!


Tuesday, June 24, 2025

G3 Mac OS 9.2 USB Drive boot test 2025

 iMac G3 Mac OS 9.2 USB Drive boot test 2025

Today I have tested booting times on my G3 Mac OS 9.2 with SSD USB drive 128GB, which very fast only 02:50.91 mins


Friday, June 20, 2025

Capturing iMac G3 (Mac OS 9.2) Screen with OBS Studio and VGA Adapter: A Complete Guide

 Capturing iMac G3 (Mac OS 9.2) Screen with OBS Studio and VGA Adapter: A Complete Guide


Why Capture Your Classic iMac G3?

In an era dominated by sleek, modern devices and cloud computing, you might wonder: why bother capturing the screen of a decades-old computer like the iMac G3? The reasons are as varied and vibrant as the translucent plastics of the G3 itself! This guide isn't just about technical know-how; it's about preserving a piece of computing history and unlocking a realm of retro fun.

Here are a few compelling reasons to dust off your iMac G3 and start capturing its screen:

  • Nostalgia and Retro Computing Revival: For many, the iMac G3 and its iconic Mac OS 9.2 operating system represent a golden age of personal computing. Capturing its screen allows us to revisit cherished memories, explore classic software, and relive the unique user experience of a bygone era. It's about more than just old tech; it's about experiencing the past.
  • Digital Preservation: Classic operating systems, applications, and even old websites running on these machines are quickly becoming digital artifacts. By capturing their screen, you're helping to preserve a visual record of how computing used to be. This is invaluable for educational purposes, historical documentation, or simply ensuring these digital experiences aren't lost forever.
  • Content Creation for Retro Enthusiasts: The retro computing community is thriving! Whether you want to create YouTube videos, share screenshots on social media, or write articles about vintage software, capturing your iMac G3's output provides authentic, high-quality material. Your unique content can connect with a passionate audience eager to see these machines in action.
  • Troubleshooting and Documentation: For fellow retro enthusiasts who might be struggling to get their old Macs working, a captured screen recording can serve as an invaluable visual guide. You can document specific software installations, system configurations, or even showcase bug fixes in a clear, reproducible format.
  • Pure Fun and Experimentation: Sometimes, the best reason is simply the joy of it. Experimenting with vintage hardware and software, and then sharing those experiences, can be incredibly rewarding. Capturing your G3's screen transforms a personal hobby into shareable content.

By the end of this guide, you'll have the knowledge and tools to bring your iMac G3's vibrant Mac OS 9.2 world onto your modern setup, ready for sharing, preserving, or simply enjoying in a new light. Let's begin!

Preparing for Your Retro Capture

Before we dive into the technical wizardry of connecting your vintage iMac G3 to a modern capture setup, a little preparation goes a long way.

Essential Gear: Preparing for Your Retro Capture
Before we dive into the technical wizardry of connecting your vintage iMac G3 to a modern capture setup, a little preparation goes a long way. This ensures a smoother, frustration-free capturing experience and is your pre-flight checklist for a journey back in time. Having all the necessary components ready and understanding their role will ensure a successful and high-quality screen capture.

Here's what you'll need:

1. VGA to USB Capture Adapter: This crucial device takes the VGA video output from the back of your iMac G3 and converts it into a digital signal that your modern computer can understand via a USB port.
(Optional addition: Briefly mention common adapter types, e.g., "often labeled as VGA Capture HD 1080P" or "USB Video Grabber")


2. 3.5mm Male-to-Male Audio Cable: One end of this cable connects to the stereo sound output (headphone jack) of your iMac G3. The other end connects to your computer's "line-in" port or to an external sound mixer before going into your computer's input.
3. OBS Studio (Open Broadcaster Software): Ensure you have OBS Studio already downloaded and installed on your modern computer. This powerful, free software will be used to record or live stream the screen video and audio from your iMac G3.

Think of this as your pre-flight checklist for a journey back in time. Having all the necessary components ready and understanding their role will ensure a smoother, frustration-free capturing experience. This section will walk you through every piece of essential gear you'll need, from the classic hardware itself to the crucial cables and software that bridge the gap between retro and modern technology. Getting this right is the foundation of a successful and high-quality screen capture.

The Star: Your iMac G3 with Mac OS 9.2

At the heart of our retro computing adventure is the iconic iMac G3 – a machine that needs little introduction to anyone familiar with Apple's revolutionary designs. Launched in a vibrant array of "flavors" and featuring its distinctive translucent, all-in-one design, the iMac G3 wasn't just a computer; it was a cultural phenomenon that marked a pivotal return to form for Apple.

For this specific screen capture project, the iMac G3 is running Mac OS 9.2. This operating system, often hailed as the "classic" Mac OS's pinnacle, offers a uniquely charming and functional user experience that predates Apple's move to the Unix-based OS X (now macOS). Navigating its desktop, launching applications like QuickTime Player 6, and interacting with its intuitive interface offers a delightful journey back to the late 90s and early 2000s.

Key considerations for your iMac G3:

  • VGA Output: Crucially for this project, the iMac G3 models typically feature a VGA output port at the rear. This port allows the video signal from the internal display to be mirrored or extended to an external monitor, which in our case, will be our capture device. Ensure this port is functional on your specific G3 model.
  • System Stability: While Mac OS 9.2 is generally robust, ensuring your iMac G3 is running smoothly will lead to the best capture results. Minimize background applications and ensure the system is stable before initiating any recording sessions.
  • Visual Appeal: The vibrant colors and distinct interface elements of Mac OS 9.2 make for fantastic captured content. Ensure your iMac G3's screen settings (resolution, color depth) are optimized for clarity if you plan to adjust them within Mac OS 9.2 itself.
This segment highlights the core hardware and software you'll be working with, setting the stage for the technical connections that follow.


The Bridge: VGA Capture Adapter (e.g., VGA Capture HD 1080P)

While your iMac G3 is a magnificent machine, its analog VGA video output isn't directly compatible with the digital USB inputs of modern computers. This is where the VGA Capture Adapter comes in – acting as the essential "bridge" between your vintage Mac and your contemporary recording setup.

This compact device performs a vital function: it takes the analog video signal from your iMac G3's VGA port and converts it into a digital format that can be transmitted over a USB cable to your recording computer. Essentially, it allows your modern PC or Mac to "see" and interpret the display output of your classic iMac.

What to look for in a VGA Capture Adapter:

  • VGA Input: Naturally, the adapter must have a VGA input port to connect to your iMac G3.
  • USB Output: It should feature a USB output (commonly USB 2.0 or USB 3.0) to plug into your recording computer. USB 2.0 is often sufficient for older VGA resolutions.
  • Resolution Support: Look for adapters that support resolutions commonly output by the iMac G3. As seen in the specifications of many such adapters, they often support a range from 640x480 up to 1920x1080, 1600x1200, or higher. This ensures compatibility with Mac OS 9.2's display settings.
  • Frame Rate: An adjustable frame rate, typically 5-60 frames per second, is desirable for smooth video capture.
  • Audio and Video Standards: Many adapters support standard UVC/UAC (USB Video/Audio Class), which means they are "plug and play" and generally do not require special drivers for most modern operating systems. This significantly simplifies the setup process.
Power Source: Most VGA to USB adapters are bus-powered via the USB connection, meaning they don't require an external power supply, adding to their convenience.
When choosing your adapter, ensuring it aligns with these specifications will provide the best possible connection and capture quality from your beloved iMac G3.


The Recorder: OBS Studio (Open Broadcaster Software)

Now that we have our iMac G3 connected to our modern computer via the VGA capture adapter, we need a way to actually record or stream the video signal. This is where OBS Studio (Open Broadcaster Software) shines.

OBS Studio is a free, open-source, and incredibly powerful software suite designed for video recording and live streaming. It's the industry standard for content creators, gamers, and anyone needing to capture or broadcast video from various sources, including external capture devices like the one we're using.

Why OBS Studio is perfect for capturing your iMac G3:

  • Free and Open Source: The fact that OBS Studio is completely free means you can achieve professional-quality screen capture without any financial investment. Its open-source nature also means it's constantly being updated and improved by a large community of developers.
  • Versatile Input Sources: OBS Studio is designed to handle a wide range of input sources. It seamlessly integrates with our VGA capture adapter, allowing you to easily select it as a "Video Capture Device" within the software.
  • Real-time Monitoring and Control: OBS Studio provides a real-time preview of your captured iMac G3 screen, allowing you to adjust settings, resolution, and audio levels on the fly.
  • Powerful Recording Options: You have full control over recording resolution, frame rate, output format (MP4, MOV, etc.), and bitrate. This ensures you can capture your iMac G3's screen in the highest possible quality.
  • Audio Capture and Mixing: OBS Studio allows you to capture audio from multiple sources, including the audio from your iMac G3 (if you've connected it). You can also mix audio from your computer's microphone, making it ideal for adding commentary or narration to your recordings.
  • Scene-Based System: OBS Studio uses a "scene" system, allowing you to easily switch between different layouts and sources. While not essential for basic capture, this can be useful if you plan to create more complex video productions.
  • Cross-Platform Compatibility: OBS Studio is available for Windows, macOS, and Linux, ensuring you can use it regardless of your modern computer's operating system.
In the following sections, we'll guide you through the specific steps of configuring OBS Studio to capture the output from your iMac G3, allowing you to preserve and share the magic of classic Mac OS 9.2 with the world.


Connectivity: VGA Cable, Audio Cables, USB Port

With our core components identified – the iMac G3 as the source, the VGA capture adapter as the bridge, and OBS Studio as the recorder – the next crucial step is establishing the physical connections. This involves ensuring you have the right cables and understanding where each one plugs in.

Here's a breakdown of the essential connectivity you'll need:

VGA Cable:

  • Purpose: This cable is responsible for transmitting the analog video signal from your iMac G3's display output to the VGA capture adapter. It's the primary visual link.
  • Connection: One end of the VGA cable plugs directly into the VGA output port located at the back of your iMac G3. The other end connects to the VGA input port on your capture adapter. Ensure both connections are secure, sometimes requiring the screws on the VGA connectors to be tightened.

Audio Cables (3.5mm Male-to-Male):

  • Purpose: While the VGA cable handles video, it does not transmit audio. To capture the iconic sounds, chimes, and application audio from your Mac OS 9.2 environment, you'll need a separate audio cable.
  • Connection: One end of a standard 3.5mm male-to-male audio cable plugs into the headphone/audio out jack on your iMac G3. The other end will typically plug into the "Line In" port (often blue) on the sound card of your modern recording computer. If you're using an external audio mixer or interface, you would route the iMac G3's audio output through that device before it reaches your computer's input.

USB Port (on the Capture Adapter and Modern Computer):

  • Purpose: The USB port on your VGA capture adapter is the digital highway for the converted video (and sometimes integrated audio) signal to reach your modern recording computer.
  • Connection: Plug one end of a USB cable (often supplied with the capture adapter) into the USB output port on the VGA capture adapter. The other end plugs into an available USB port (USB 2.0 or 3.0) on your modern computer. This connection powers the adapter and carries the digitized video/audio data that OBS Studio will then process.
By correctly connecting these cables, you'll create a seamless pathway for your iMac G3's audiovisual output to be recognized and recorded by your modern computer, setting the stage for capturing its retro magic.


Modern PC/Mac for OBS

While our focus is undoubtedly on the charming retro glory of the iMac G3 and Mac OS 9.2, it's crucial to remember that a powerful modern computer serves as the recording studio. This PC or Mac is where OBS Studio runs, processing the video and audio data streamed from your VGA capture adapter.

Even though the source material (the iMac G3's output) might be low-resolution by modern standards, capturing and encoding video in real-time can still be demanding on your computer's resources. OBS Studio, while efficient, benefits greatly from a capable machine.

Key considerations for your Modern PC/Mac:

  • Processor (CPU): A multi-core processor (Intel Core i5/i7/i9 or AMD Ryzen 5/7/9 equivalent) from recent generations is highly recommended. This ensures smooth encoding of your video without dropping frames, especially if you plan to record at higher resolutions or frame rates supported by the capture card (e.g., 1080p at 60fps).
  • Memory (RAM): 8GB of RAM is generally the minimum, with 16GB or more being ideal. Sufficient RAM helps OBS Studio run efficiently, especially when handling multiple sources or longer recording sessions.
  • Storage: A fast storage drive, like an SSD (Solid State Drive), is highly beneficial for saving your recorded video files. HDDs (Hard Disk Drives) can work, but SSDs reduce the chance of recording bottlenecks. Ensure you have ample free space for your video recordings, as uncompressed or high-quality video files can be very large.
  • Operating System: OBS Studio is compatible with Windows (Windows 10/11), macOS (Monterey or newer), and Linux. Ensure your operating system is up-to-date for the best compatibility and performance.
  • USB Ports: Your modern computer will need an available USB port (preferably USB 3.0, though USB 2.0 can work for most VGA capture scenarios) to connect the VGA capture adapter.
  • Audio Input (Line-In): As discussed, if you're capturing audio separately from your iMac G3, your modern PC will need a "Line-In" audio input port (often a blue 3.5mm jack). Alternatively, an external audio interface or mixer can be used to route the audio into your computer.
By ensuring your modern PC or Mac meets these specifications, you'll provide OBS Studio with the power it needs to flawlessly capture every pixel and sound from your classic iMac G3, bringing its retro charm into the digital age.


Monday, May 19, 2025

Mac OS 9.2.2 & QuickTime 6 on USB SSD: A Modern Install for Your Vintage iMac G3

 iMac G3 500MHz: USB SSD Upgrade - Ditching the Failed IDE Bus for OS 9.2.2 & QuickTime 6

iMac G3 Specification:

Imac G3 500MHz RAM 128+512 = 640 MB IDE Bus Fail, Install Mac OS 9.2.2 on SSD USB Drive 128GB or Minimal 4GB USB drive.


iMac G3 running Mac OS 9.2.2 and QuickTime Player.

Download Mac OS 9.2.2


Zip file name macos-922-uni.zip
and burn to CD or DVD disc with Low Speed require might be 4x


iMac G3: The USB SSD Connection Solution.


installation of Mac OS 9.2.2 on your iMac G3 using this hardware configuration likely proceeded as follows:

  1. Powering the Peripherals: The USB 3.0 hub provided sufficient power to run the external DVD drive, which is crucial for reading the installation CD.
  2. Connecting via the Hub: The USB hub allowed you to connect the necessary peripherals (DVD drive, mouse, keyboard, and potentially the target USB/SSD drive) to the iMac G3's limited USB 1.1 ports. While USB 3.0 devices will operate at USB 1.1 speeds on the G3, the hub provides the necessary connectivity.
  3. Booting from the DVD Drive: With the external DVD drive connected and powered, you were able to boot your iMac G3 from the Mac OS 9.2.2 installation CD in the external drive. This is typically done by holding down the "Option" (Alt) key during startup. This will bring up the Startup Manager, allowing you to select the external DVD drive as the boot device.
  4. Installation to USB/SSD: During the OS 9.2.2 installation process, you selected your connected USB or SSD drive (which was likely formatted as FAT32 with an Apple Partition Map beforehand) as the target destination. The OS 9 installer then reformatted the necessary partition on the USB/SSD drive to Mac OS Extended (HFS+) to install the system files.
  5. Booting from USB/SSD: After the installation was complete, you were able to boot your iMac G3 directly from the external USB or SSD drive, enjoying potentially faster performance compared to the original internal hard drive (especially with an SSD).
In summary, success relied on using a USB hub to overcome the iMac G3's limited USB port availability and potentially power constraints, allowing you to boot from an external DVD drive and install Mac OS 9.2.2 onto an external USB or SSD drive. The initial FAT32 formatting with an Apple Partition Map on the target drive likely facilitated its recognition by the iMac G3's firmware during the boot process.

Preparing an External SSD USB Drive for Mac OS 9.2.2 Installation on an iMac G3 (Successful Method):

  1. On a modern Mac (e.g., your MacBook Pro), connect the external USB drive.
  2. Open Disk Utility (Applications > Utilities) or Recommend first format USB drive as FAT32 on windows.
  3. Select the external drive in the sidebar.
  4. In the "Format" dropdown menu, choose MS-DOS (FAT) or FAT32.
  5. In the "Scheme/Partition Map" dropdown menu, choose Apple Partition Map.
  6. Click Erase.
  7. Name: Give the drive a name (e.g., "OS9Install").
  8. Click Erase and confirm the action.
  9. Connect the formatted USB drive to your iMac G3.
  10. Boot the iMac G3 from your Mac OS 9.2.2 installation media (e.g., a CD-R).
  11. Follow the on-screen instructions of the Mac OS 9.2.2 installer.
  12. During the installation process, you will be prompted to select a destination disk. Choose the prepared USB drive.
  13. The Mac OS 9.2.2 installer will then format the necessary partition on the USB drive as( Mac OS Extended (HFS+) or Mac OS Standard) and configure it with an Apple Partition Map to make it bootable.
  14. Complete the installation process.
Note:
Mac OS Standard (HFS) has a maximum volume size of 2 terabytes (2048 GB).
Mac OS Standard: Will work and support the capacity.
Mac OS Extended (HFS+): The generally recommended option as it's more modern, efficient, and doesn't have the 2TB individual file size limit.

Imac G3 500MHz RAM 128+512 = 640 MB IDE Bus Fail, Install Mac OS 9.2.2 on USB Drive 4GB .

  1. Successful Story Update: Minimum USB Drive Capacity for Bootable Mac OS 9.2.2 on iMac G3
  2. Based on your experience, after a full installation of Mac OS 9.2.2 onto an external USB drive, the total disk space used is less than 390MB.
  3. This means that even relatively small, older USB drives with capacities of 4GB or 8GB formatted as FAT32 (initially, for firmware recognition) and then formatted by the OS 9.2.2 installer as Mac OS Extended can comfortably accommodate a full and bootable installation of the operating system.
  4. This is excellent news because it makes the project more accessible, as users might have older, smaller USB drives readily available.
  5. Updated Steps (emphasizing USB drive capacity):
  6. Obtain a USB drive (4GB or larger is sufficient).
  7. On a modern Mac, format the USB drive as FAT32 with an Apple Partition Map.
  8. Connect the USB drive to your iMac G3.
  9. Boot from your Mac OS 9.2.2 installation media.
  10. Select the USB drive as the installation destination.
  11. The installer will format the USB drive (or a partition on it) as Mac OS Extended.
  12. Complete the installation.

Installation Quick Time Player 6.0 on  Imac G3 (Power PC) Mac OS 9.2.2

Success! Installing QuickTime Player 6.0 on an iMac G3 (PowerPC) Running Mac OS 9.2.2
  • Bringing modern (or at least more diverse) multimedia capabilities to a classic iMac G3 running Mac OS 9.2.2 can sometimes feel like a challenge. However, installing QuickTime Player 6.0 proved to be surprisingly straightforward using a direct file transfer method. Here's how it was done:
  • The Key File: The crucial element was locating the QuickTime_Installer.smi_.bin file online https://www.macintoshrepository.org/2473-quicktime-6-0-3 . This specific compressed archive seemed to be the magic ticket for a direct installation.


  • Transfer via USB: Using a modern MacBook Pro, the QuickTime_Installer.smi_.bin file was copied to a standard USB drive.
  • Connecting to the Classic: The USB drive was then connected to the iMac G3 running Mac OS 9.2.2.
  • Initiating Installation: A simple double-click on the QuickTime_Installer.smi_.bin file on the iMac G3 triggered a decompression process, placing QuickTime_Installer.smi on the desktop.
  • Running the Installer: Another double-click on the newly created QuickTime_Installer.smi file launched the familiar QuickTime 6 installation wizard.
  • Basic or Pro? No Problem! The installer offered a choice between Basic and Pro versions. Interestingly, the registration screen for both versions could be easily bypassed. Simply entering a name and clicking "Continue" allowed the installation to proceed without needing a registration key.
  • Final Step: Restart: After the installation completed, a restart of the iMac G3 running Mac OS 9.2.2 was performed to finalize the integration of QuickTime Player 6.0.
  • The Result: QuickTime Player 6.0 was successfully installed and ready to play a wider range of multimedia formats on the classic iMac G3, all without the complexities of disk image mounting or the need for a registration key for basic functionality. This direct file and installation method offers a surprisingly smooth way to enhance the multimedia capabilities of these vintage machines.

Convert mp4 to Mpeg for Quick Time Player 6.0 on Imac G3 (Power PC) Mac OS 9.2.2

Successful Solution:


  • Upload the MP4 video file to Convertio.
  • Choose the output format as MPEG (.mpg). (Note: The specific MPEG encoding settings within Convertio that lead to compatibility with QuickTime 6 on OS 9.2.2 seem to work by default, even though the resulting file size may be significantly larger.)
  • Download the converted .mpg file.
  • Transfer the .mpg file to the iMac G3 using a USB drive.
  • Open the .mpg file with QuickTime Player 6 on macOS 9.2.2.
Key Observation: While the conversion to MPEG using Convertio resulted in a much larger file size (e.g., a 7MB MP4 became a 23GB MPG), the resulting .mpg file was successfully playable in QuickTime Player 6 on the iMac G3 without requiring any additional codecs or complex installation procedures.
Lesson Learned: Online conversion tools can sometimes provide a straightforward way to bridge compatibility gaps between modern video formats and older media players, even if it comes at the cost of increased file size.


Sunday, February 14, 2021

Radio Microwave Equipment File Format for PathLoss

 PathLoss Equipment File Format

PathLoss is the Windows Application to calculate radio microwave, which powerful and high accuracy. Also user need to build the equipment file format according with application require, which this application have equipment format as follow.

PLW40_RADIOSPEC
MANUFACT,// * manufacturer,Char(35),
MODEL,// * radio model,Char(23),
COMMENT_1,,Char(35),
COMMENT_2,,Char(35),
COMMENT_3,,Char(35),
COMMENT_4,,Char(35),
COMMENT_5,,Char(35),
COMMENT_6,,Char(35),Manual Not have
EMDESIG,// emission designator,Char(23),
RADIO_ID,// radio id,Char(23),15
MODULATION,// * modulation QPSK 128 QAM,Char(23),
CAPACITY,"// * Airlink Capacity, Mb/s",Char(23),
DATA_RATE,// data rate Mb/s,numeric,
STABILITY_PRC,// frequency stability percent or,numeric,
STABILITY_PPM,// frequency stability part per million,numeric,
SPECTRMBW_MHZ,// * 3 dB spectrum bandwidth (MHz) used for default curves,numeric,read
CHANNELBW_MHZ,// channel bandwidth (MHz),numeric,
MAXRXSIG_10-3,// maximum receive signal for 10-3 BER (dBm),numeric,
MAXRXSIG_10-6,// maximum receive signal for 10-6 BER (dBm),numeric,
TtoI_COCHAN_LIKE,// * threshold to interference ratio like modulation (dB),numeric,
TtoI_COCHAN_CW,// threshold to interference ratio CW modulation,numeric,
TXPOWER_DBM,// * transmit power (dBm),numeric,
FREQ_LO_MHZ,// * lower frequency limit (MHz),numeric,
FREQ_HI_MHZ,// * upper frequency limit (MHz),numeric,
ATPC_RANGE,// automatic TX Power control range (dB),numeric,
NUM_ATPCSTEPS,// number of steps in the power control range (dB),numeric,
DIGRADIO_TYPE,"// PDH, SDH or NB_DIGITAL  (Narrow band digital)",,
SD_OPERATION,// BBS or IFC baseband switch or IF combiner,,
COCHANNEL_OPERATION, // YES or NO,,
USE_SIGNATURE,// YES or NO,,
XPIF,// Cochannel XPD improvement factor,numeric,
XPD_XPI,// XPD of the XPIC device,numeric,
IF_COMB_GAIN,// IF combiner gain for IFC baseband switch,numeric,
LCOMB_FACTOR,// IF combiner selective fading improvement factor in Space Diver,numeric,
BITS_BLOCK,// bits per block (* SDH only),numeric,
BLOCKS_SEC,// block per second ( * SDH only),numeric,
ALPHA1,//errors per burst in the BER range from 10e-3 to BERses (SDH only),numeric,
ALPHA2,//errors per burst in the BER range from BERses to residual BER (SDH only),numeric,
ALPHA3,//errors per burst below the residual BER (SDH only),numeric,
SIGNATURE_DELAY_10-3,// signature delay (ns) at BER 10-3,numeric,
SIGNATURE_WIDTH_10-3,// signature width (MHz) at BER 10-3,numeric,
SIGNATURE_MINPH_10-3,// signature depth - minimum phase (dB) at BER 10-3,numeric,
SIGNATURE_NONMINPH_10-3,// signature depth - non minimum phase (dB) at BER 10-3,numeric,
SIGNATURE_DELAY_10-6,// signature delay (ns) at BER 10-6,numeric,
SIGNATURE_WIDTH_10-6,// signature width (MHz) at BER 10-6,numeric,
SIGNATURE_MINPH_10-6,// signature depth - minimum phase (dB) at BER 10-6,numeric,
SIGNATURE_NONMINPH_10-6,// signature depth - non minimum phase (dB) at BER 10-6,numeric,
SIGNATURE_DELAY_RBER,// signature delay (ns) at BER RBER,numeric,
SIGNATURE_WIDTH_RBER,// signature width (MHz) at BER RBER,numeric,
SIGNATURE_MINPH_RBER,// signature depth - minimum phase (dB) at BER RBER,numeric,
SIGNATURE_NONMINPH_RBER,// signature depth - non minimum phase (dB) at BER RBER,numeric,
SIGNATURE_DELAY_SES,// signature delay (ns) at BER SES,numeric,
SIGNATURE_WIDTH_SES,// signature width (MHz) at BER SES,numeric,
SIGNATURE_MINPH_SES,// signature depth - minimum phase (dB) at BER SES,numeric,
SIGNATURE_NONMINPH_SES,// signature depth - non minimum phase (dB) at BER SES,numeric,
DISPFM_10-3,// dispersive fade margin at 10-3 BER (dB),numeric,
DISPFM_10-6,// dispersive fade margin at 10-6 BER (dB),numeric,
DISPFM_SES,// dispersive fade margin at SES BER (dB),numeric,
DISPFM_RBER,// dispersive fade margin at residual BER (dB),numeric,
RXTHRESH_10-3,// RX threshold at 10-3 BER (dBm) (* SDH Only),numeric,
RXTHRESH_10-6,// * RX threshold at 10-6 BER (dBm),numeric,
RESIDUAL_BER,// residual bit error rate - scientific notation 1E-10,numeric,
RXTHRESH_RBER,// RX threshold at RBER (dBm),numeric,
SES_BER,// SES bit error rate - scientific notation 4.6E-4 (optional),numeric,
RXTHRESH_SES_BER,// RX threshold at BERses (dBm) (optional),numeric,
// start of curves
TtoI_150Mbps-16QAM 47
… TtoI Pair, Number
RX_SELECTIVITY
TX_FILTER
RX_FILTER


Friday, July 3, 2020